
Build a backyard trapping tunnel
Introduction
A trapping tunnel is a box to put a rat trap inside. The tunnel is designed to protect your young family members and pets from the trap.If there is a Predator Free community near you, they will likely have trapping tunnels ready to go, but if there isn’t a group nearby, or if you’re up for a challenge, you can make the tunnel yourself.
The instructions below come from Predator Free Mt Cook & Newtown.
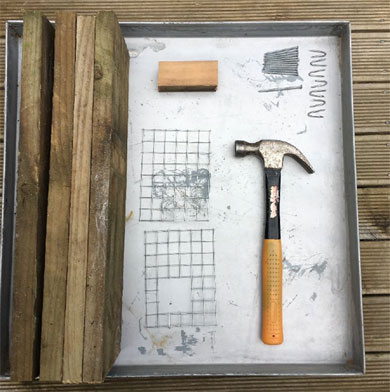
Materials and tools you'll need
Image: DOC
What you'll need
Materials
- 4 x planks of fencing timber (150mm x 25mm x 500mm)
- 10 x 60mm jolt head nails
- 1 x 75mm flat head nail
- 7 x staples
- 1 x front mesh screen (with opening cut out using wire cutters)
- 1 x back mesh screen
- 1 x rat trap (and mouse trap optional)
- 10mm galvanised weld mesh
Tools
- Hammer
- Wire cutters
Sourcing your materials
You can find all the building materials at your local hardware store. Ask someone in the shop for help finding the right types of nail and staple. They can help you choose the right mesh too.
You'll find long planks of fencing timber in the store. If you take these up to the counter they will be able to cut the plank into shorter (150mmx 25mm x 500mm) lengths for you.
You'll also need to get traps - you can get them from:
Now you have everything, you can get started with construction.
Construction
Step 1: Fasten the bottom to the sides
Hammer a 60 mm nail into each corner of the bottom piece through to the walls. It's a bit fiddly to hold the pieces in the correct position, so you may need some help for this. Add a nail to the centre of each side for added strength.
Step 2: Nail the lid on
Line up the sides to the lid and nail in each corner.
Step 3: Staple on the front mesh
Fasten the front mesh to the tunnel by hammering a staple into each corner. Ensure the entrance hole is level with the top of the bottom piece of wood.
You can see that we have added an extra block of wood to the top of the trap for stability, but this is optional.
Step 4: Staple on the back mesh
Flip the box over and hammer a staple vertically to the bottom corners of the back mesh – the mesh should hinge open like a door.
Hammer the final staple in the centre of the top piece of wood just above the top wire of the mesh. Hammer it in so the 75 mm nail can be inserted through the staple without being too loose. The nail holds the door closed.

Trap tunnel building steps
Image: DOC
That’s it, you’re done.
Get instructions on how to trap in your backyard – includes tips on getting the most out of your trap.
Resources
Best practice for wooden rat trap tunnel design (PDF, 1,100K)